Halloween makeup and nail art: 8 Beauty Panel tips for creating your most memorable costume ever
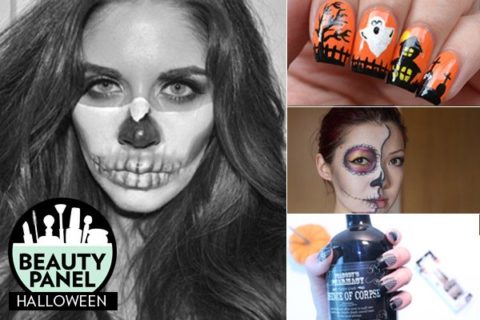

Correct us if we’re wrong, but Halloween is a beauty lover’s favourite holiday. An excuse to use all your favourite makeup products and nail polishes that are often deemed just a bit too outlandish for day to day? What could be better? From intricate nail art to over-the-top makeup, this is a great time, nay, the best time, to try out the looks you’ve been meaning to experiment with. When else are you going to see if you can pull off skeleton-chic?
Challenge 79: What’s your favourite Halloween beauty look? See the answers now! »
Have a beauty question you want to see the panel answer? Send it our way at [email protected]. Read on for the answers to this week’s challenge and for more goodness, get to know all contributors on our Beauty Panel hub page.
Jump to: SHAYNA WIWIERSKI | JAYNE LIM | KELLY F | EUGENIA RAGAS | SARAH MUNCASTER | MICHELLE LOUIE | MIKAYLA TRAN | MICHELE LEUNG

Shayna Wiwierski
Winnipeg | A Pop of Colour
Halloween has always been my favourite holiday. Although it’s not really acceptable to go trick-or-treating once you are past your pre-teens (not gonna lie, I still take my dog), dressing up for the holiday is still mandatory.
I’ve always loved keeping Halloween scary. Whether it’s being a zombie or a skeleton, pick something that really embraces the spirit of Halloween. Sugar skulls were super popular last year, but I’ve been obsessed with skulls for a while now, so I went with a more glamorous skull look for this challenge. As fun as this was to do, it’s definitely a more serious look, a smile totally ruins the effect of the makeup. So this season, if you’re rocking a skull mask, make sure that your smile is turned upside down the entire night. For one night only, a scowl is the new black.
Products used: Make Up For Ever 12-Color Flash Palette, New York Color HD Color Trio Eye Shadow (“Central Park Plums” and “Skyrise Steel”), New York Color Big Bold Curl mascara, and Kiss Looks So Natural lashes (“Shy”)

Jayne Lim
Vancouver | Cosmetic Proof
Sometimes I feel like Halloween is a much more exciting time than Christmas in the beauty world because of the risks we can take with hair, makeup and nails. Halloween is definitely a time of experimentation and when it comes to nail art, orange and black had better be your best friends!
The hardest part about creating this nail art look was deciding what to draw on each nail as Halloween has so many ghouls, goblins and creatures that are a ton of fun to re-create! I decided to have all the designs connect and create a haunted house with a garden scene. For my base coat, I applied one coat of Sally Hansen Nail Rehab Strengthener to clean, bare nails to nourish my currently dry nail beds. I, then, applied two coats of Sally Hansen Insta-Dri Matte in Pumpkin Queen aka the perfect Halloween orange.
For my index finger, I used black acrylic paint to free hand my creepy tree as well as the fence and used Sally Hansen Insta-Dri Fast Dry Nail Color in Night Fright to draw in the ground and “cap” the free edge of my nail (for tip durability). For my middle finger, I decided that a ghost should be living in the garden so using white acrylic paint, I drew a rough outline of a ghost, coloured it in and then used a dotting tool to create the eyes and mouth. For my ring finger, I free-handed the shape of a haunted house. You don’t have to be too neat here since it’s haunted and CAN be as crooked as you want! The windows and full moon were drawn in with yellow acrylic paint. In the “backyard” is where the cemetery lies, with the tombstones drawn in black acrylic paint and the ground in black polish. Finally, scare all of your “neighbours” with a Halloween saying like “Boo!” right on the thumb!
Products used: Sally Hansen Nail Rehab Strengthener, Sally Hansen Insta-Dri Matte in Pumpkin Queen, Sally Hansen Insta-Dri Fast Dry Nail Color in Night Fright, black, white and yellow acrylic paint and Rainbow Honey Scented Top Coat in Candy Mountain.

Kelly Freeman
Mississauga | Glitter Diaries
To put together your own Dia de los Muertos (Day of the Dead) Halloween look, you can go as intricate and detailed as you’d like or stick with the overall basic idea for this makeup. The more detailed you go, the more skill it will require so I decided to create mine in a way that can be easily recreated for all skill levels. First you need to get yourself a Halloween makeup kit or if you already have some coloured grease paint/cream colours then that’s even better! I also bought some cheap art brushes to create the designs with, so I could spare my makeup brushes from getting the grease paint on them. You can also buy cheap sponges to help with the application at any dollar store.
I started by applying the white grease paint all over my face. It helped give the colours on top something to adhere to and make them look more vibrant. Next I outlined and filled in the black around my eyes and the part on my nose. The black outline around the eyes served as the anchor for where the designs were going to be drawn around. I drew them like flower petals first by doing the purple outline and then filling them in with the red. I wanted to add more of a pop of colour to the petals so I added a bit of blue and yellow to the base, then I outlined it with black to give it definition.
Products used: Spirit Halloween White Grease Makeup, Spirit Halloween Makeup Kit: White, Blue, Red,Black crayons, Spirit Halloween Makeup Kit Color Wheel, Make Up For Ever White e/s (#0), Cinema Secrets Black Grease Paint, Cinema Secrets Black Grease Paint, Make Up For Ever Aqua Liner in 0L, Annabelle Le Big Show Mascara, Wet n Wild Black Kajal Eyeliner, NYX Black Bean Jumbo Eye Pencil

Eugenia Ragas
Montreal | Ommorphia Beauty Bar
I may be a little old to go trick-or-treating, but that doesn’t mean I can’t get into the ‘spirit’ of things with my manicure! As someone who’s somewhat nail-art challenged, I prefer to use a much simpler way to jazz up my nails, whether it’s with the help of a glitter polish (such as Essie’s Belugaria), a unique topper (like OPI’s Matte Top Coat), or an embellishment (similar to the skull from the Nails Inc. Leather Effect kit). You can never go wrong with a deep ‘vampy’ shade as well, and Dior’s #970 Nuit 1947 with it’s brooding depths and mysterious hint of shimmer – fits right into the theme. Another touch I like to add, is gold – especially when worn as a base coat to frame a complimentary colour on top, or added in the form of flakes along various parts of the nail – or even applied up the tip of the nails like the fiery swirls of hell (appropriate, no?).
Regardless of how you choose to dress up your nails, any one of these looks is not only easy to recreate, but can be worn long past Halloween … or at least before the last piece of candy has been devoured.
Polishes used: from a-england, China Glaze, Dior, Essie, OPI, and Nails Inc.

Sarah Muncaster
Toronto | Beauty Funk
Here is my halloween costume from last year. It was a twist on the popular deer costume; a dead deer! For the makeup, all you really need is white face paint, black eyeliner, a lot of bronzer, and brushes for blending! I used NYX jumbo pencil in Milk to create the white dots, and Rimmel Natural Bronzer to contour. Using a headband, I secured leaves and branches throughout my hair. It was a huge hit and one of the easiest costumes I have ever put together!

Michelle Louie
Toronto | A Lovely Allure
I started by drawing the black line down the middle with a Mufe black eyeliner. Blending it out onto the normal side to create a gradient effect. Then I used a the lightest concealer I had, L’Oreal True Match Anti-Fatigue Concealer in Ivory Beige, all over the skull side just to lighten it a bit.
Since I don’t have face paint, I used Nyx Jumbo Pencil in Milk all over, including my lips, to lighten the one side of my face. It isn’t as white as I’d like, but it would have to do. I powdered my face and then went over the line down the middle (carefully) a few more times. For the cheekbone, I used both a brown and grey eyeshadow by MAC (Night Manoeuvres & Print). Make sure the eyeshadows are matte, and not sparkly!
To cover the brow, I know there is this glue stick technique, but I couldn’t find a glue stick so I just used an eyebrow wax to go over the brow a few times and used the Nyx Pencil in Milk over it, which covered it pretty well because I have thin eyebrows.
For the rest of the eye I used the black eyeliner to draw a large circle around it. You can fill it in with some fun colours or black! I used my Coastal Scents 252 Palette and Urban Decay Vice Palette and just messed around with some pinks, yellows, and purple. I then created the flower-like design around the eye using a liquid liner, and blended some black eyeshadow into it. I finished the eye off with liquid eyeliner and mascara. I would suggest using some dramatic lashes with this look!
I used the same black eyeliner to draw the nose, design on the chin, and lips. I also added some pink on the chin for some colour, and to match the eye.

Mikayla Tran
Toronto | Beauty Echoes Magazine
If you’re not the type to fully dress up for Hallowe’en but still want to look fashionably ghoulish around the office, these press-on nails by Kiss are definitely a favourable choice. Not only does it take just a few seconds to apply, they are also securely designed with revolutionary SafeHold adhesive technology that keeps them from falling off and best of all – they won’t cause any damage to your own nails!
I absolutely love how fantastically fun and intricately designed these press-on nails are and surprised to know that they can last up to a week.
Products used: Kiss ImPRESS Press-on manicure

Michèle Leung
Toronto | Ruban x Rose
For a golden goddess look, highlighting key points on your face such as your eyebrows, cheekbones, collar bones, etc, will really change your entire look. Dab gold shimmer on to your lips to create a golden lip colour. You can also add glitter to your hair by hairspraying first and dabbing glitter on. And finally, contour! Make sure to contour strongly as a gold can make all of your features mash together.