4 Easy Valentine’s Day Manicures That You’ll Love (Even if You Hate the Day)
Nail art may be a bit much for day-to-day (unless you’re into minimalism!), but it’s still a total go-to during the holidays – Valentine’s Day included. It’s both a subtle and fun way to celebrate the lovey-dovey holiday, so we’re not the least bit surprised. But by now, we’re pretty sure you’ve looked through every single nail art design Pinterest has to offer, so you are probably in search of some fresh new inspo. Well today’s your lucky day. This week, Beauty Panel is graciously sharing their manicure plans for Valentine’s Day. Whether you’re looking for an easy-to-master design or an OTT mani, these beauty bloggers have a design (and step-by-step guide) for you.
Challenge 110: How do you do Valentine’s Day-inspired nail art? See the answers now! »
Have a beauty question you want to see the panel answer? Send it our way at [email protected]. Read on for the answers to this week’s challenge and for more goodness, get to know all contributors on our Beauty Panel hub page.
Stephanie Lau
Toronto | Fun Size Beauty
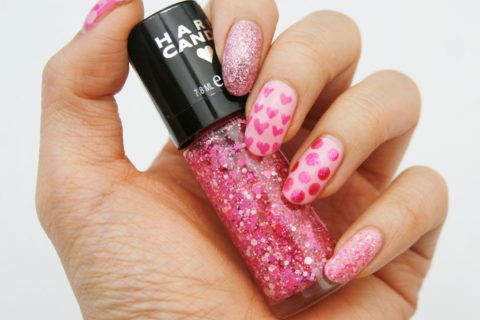
There’s no better time for over-the-top cheesiness than Valentine’s Day. To celebrate, I’ve painted my nails to match. And let’s just say there’s a bit of sparkle and a whole lot of cute going on.
On my pointer and pinky nails, I used my favourite pink glitter from Wet N Wild and a top coat from Hard Candy. For the most opaque and goop-free application of glitter, paint a few swipes of glitter onto a porous sponge (the sponge will absorb the excess polish). Then, dab the glitter onto your nails.
On my thumb and ring finger, I started with a base coat of a pink colour, then used the rounded back of a brush to create large polka dots.
Lastly, on my middle finger, I started with a light pink base and used a slightly deeper pink to draw mini hearts with a small dotting tool.
Are these nails a little too cheesy for you? There are options! Choose one nail (either a glitter, polka dots or hearts) and make that your accent nail and paint the other four of your fingertips a solid baby pink for a simpler look. Happy painting!
Products used: Wet N Wild Sparkled, Sephora Formula X Color Curators Collection (Patrick Starr) in “She Better Werk,” “Yazzz” and “Lucky Starrr,” Hard Candy Flower Bomb, Seche Vite Top Coat
Katie Elwood
Vancouver | Katie Elwood
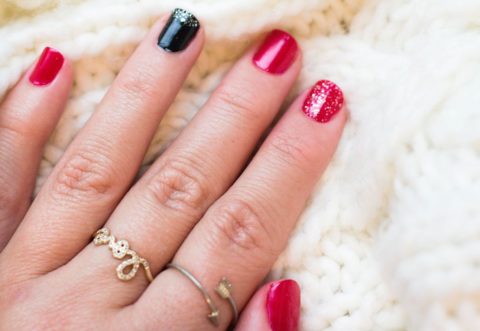
Valentine’s Day is right around the corner. I usually keep my nails fairly simple with nudes, pinks, classic reds or black polish but this time I decided to mix it up. This look is fairly simple to achieve. First up, prep your hands. I recommend a good moisturizer and cuticle oil to start. Clean off the excess oil on the nails with nail polish remover. Apply a base coat and leave to dry for a minute. Next, apply two coats of red and/or black polish. I chose to do one nail with black and the rest red. You could also do the reverse and have only one red nail. For an extra touch use gold glitter polish for either the tips or all over one or two nails. Finish with a top coat and you’re done!
Products used: Essie Nail Polish in “Really Red,” Essie Nail Polish in “Licorice,” Essie Nail Polish in “Rock at the Top,” Essie “Gel Setter”
Colleen Conroy
Vancouver | Blush Rouge
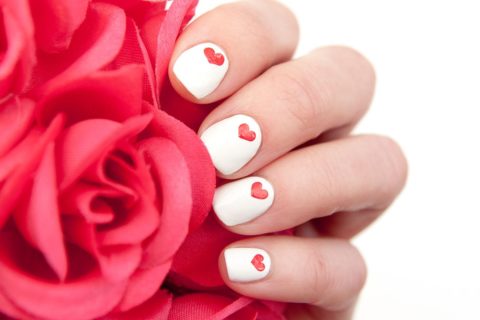
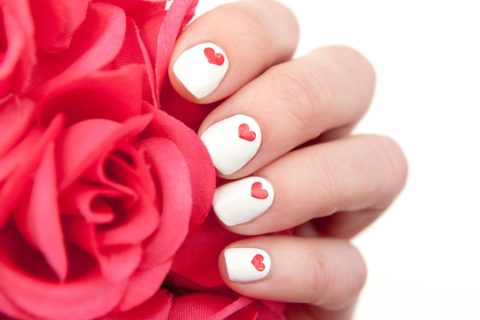
February is the month of love, and what a fun way to show it by jazzing up your nails in a cute and romantic way. Below is my step-by-step guide for this ‘heartfelt’ mani!
1) Prep nails by shaping, buffing and doing a little cuticle care.
2) Apply white polish. (I wanted the whites to be very solid and opaque, so I opted for three full coats.)
3) Using a nail dotter (or end of a bobby pin) lightly dab two red dots onto your nail side by side near the top.
4) Then take your detailing brush and swoop those two dots downwards to meet in a V. If you need to, dip the brush into more red polish and continue to connect the red dots into a heart shape.
5) Wait as long as you can (and I mean long!) for the polish to completely dry before applying a topcoat.
And there you have it! Go ahead and wear your heart on your nails this season. Happy love month everyone!
Products used: Nail file, Nail buffer, Red Carpet Premier Hydrating Cuticle Balm, Sally Hansen Miracle Gel Polish in “Get Mod,” Sally Hansen Miracle Gel Polish in “Red Eye,” bobby pin for dotting, thin detailer brush, Sally Hansen Miracle Gel Polish Top Coat
Shawna Friedberg
Toronto | Spill the Beauty
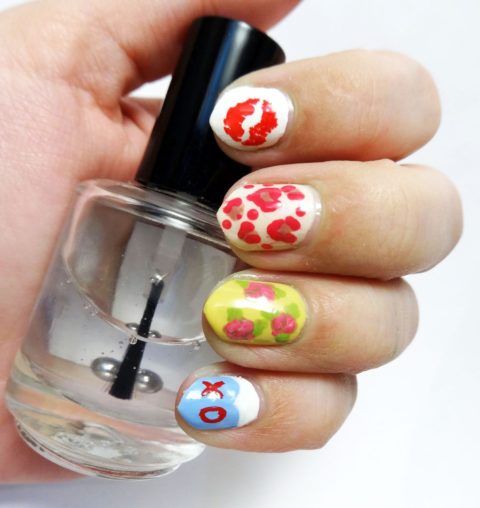
Every year I do some variation of Valentine’s Day nail art, however my designs end up feeling sort of repetitive. This year, in an effort to spruce up my nail game, I did a different design on each nail. All it takes are some soft colours, a skinny nail art brush and a steady hand.
Products used: Essie Nail Polish in “Bikini So Teeny,” Sally Hansen Nail Polish in “Fuchsia Power,” Pure Ice Nail Polish in “Wild Thing,” Pure Ice Nail Polish in “Shell Pink,” Zoya Nail Polish in “Brigitte,” Sinful Colors in “Snow Me White,” NYC Nail Polish in “Lexington Yellow,” L.A Colors Art Deco in “White,” Kleancolor Nail to Toe in “Passion Flame,” Krafty Gurl in “Gloss It!”

