Canada Day nail art: 9 patriotic red and white manicures to try this long weekend
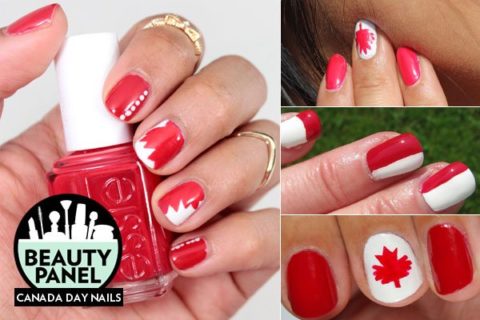

With Canada Day just around the corner, it’s time to start planning those red and white outfits! Whether you’re spending the long weekend at the cottage or celebrating in the city, Canada Days calls for the addition of a patriotic ensemble. But if there’s nothing in your wardrobe that suits the occasion, consider inserting some red and white into your beauty routine. No, we’re not suggesting you go all out with a maple leaf flag face paint situation—instead take it to your nails with some Canada Day nail art.
The best part about doing a themed manicure for Canada Day is that no matter your talent level, there’s a nail art option for you. Whatever combination of red and white nail polish you end up applying will get the patriotic message across! To get the Canada Day nail art ideas rolling, we asked the Beauty Panel to share their long weekend manicures. From simple red and white dots to intricite maple leaf designs, these manis are sure to inspire some Canada Day nail art of your own, adding the perfect dose of patriotic pop to your long weekend.
Challenge 17: Happy Canada Day! What are you wearing on your nails this weekend? See the answers now! »
If you’re considering adding something unique to your Canada Day nail art design, Marilou Moles from Twenty York Street shows us how she incorporated dots and glitter to keep things interesting. Looking for something other than the Canadian flag? Dee Thomson from Liner Glitter Gloss shares a splatter manicure that is not only a creative masterpiece, but also a fun design you can do with your friends before you head out the door to join the festivities. Still unsure about trying your hand at nail art? Perilously Pale’s Christa Potter shows that red and white off centre stripes are both easy to do to and makes for a playful accent that’s long weekend-ready.
Have a beauty question you want to see the panel answer? Send it our way at [email protected]. Read on for the answers to this week’s challenge and for more goodness, get to know all contributors on our Beauty Panel hub page.
Jump to: AÏDA MICHELLE LOPES | ALEEZA AGNO | ALISON LEONG | CHRISTA POTTER | DEE THOMSON | ELLIE SOMFELEAN | MARILOU MOLES | SANDRA D SOBON | TESS LOPEZ
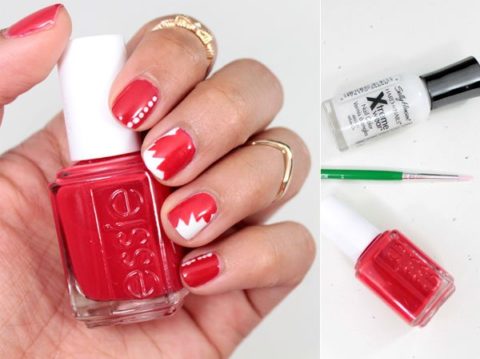
Aleeza Agno
Toronto | Stylish & Literate
This weekend is the perfect time to sport a red and white mani. Add a little patriotic pop and you’re set! Happy Canada Day and enjoy the long weekend!
Products used: Sally Hansen Xtreme Wear in “White On,” Essie in “Lollipop,” a thin paint brush
Christa Potter
Kawartha Lakes| Perilously Pale
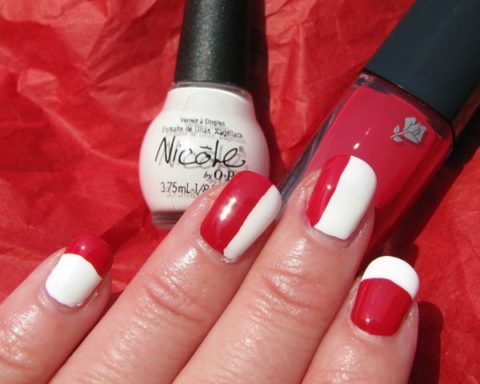
Happy Canada Day beautifuls! July long weekend is all about celebrating how lucky we are to be part of such a great country. What better way to spread the red and white Canada love than with Canada Day nail art? I wanted to include a maple leaf in this design but the nail art brush I picked up at the local drugstore is just not precise enough for detail work. Time to find a more professional caliber tool! I kept it simple with opposite french manicure style nails in red and white as well as nails with off-centre red and white stripes.
Products used: Lancome Vernis in “Love 154M Miss Coquelicot,” Nicole by OPI Scandalous! Neons Mini Kit in “White”
Dee Thomson
Toronto | Liner and Glitter and Gloss, Oh My!
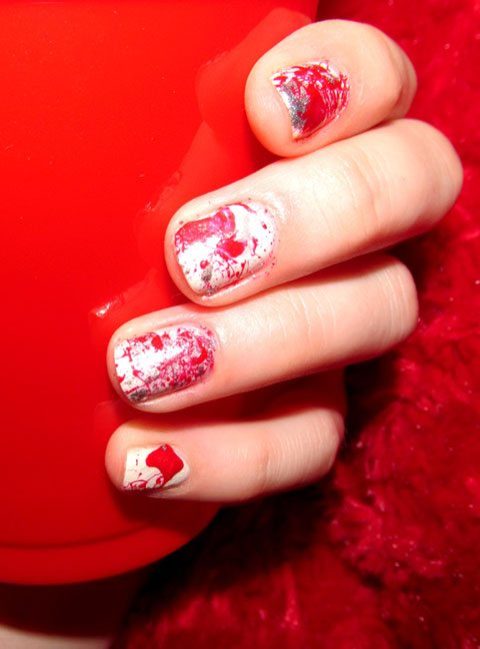
Canada Day is one of the most fun times to play around with your look—red and white is everywhere! I find that fun, Canada-themed nails is the one place you can get really creative. I know not everyone is a Van Gogh when it comes to nail art, so I wanted to share a fun mani that anyone can pull off: the splatter mani! This is perfect for Canada Day but can also be easily used to fit other celebrations and colour schemes. All you will need for this is a few different shades of polish, a straw or two and some scotch tape. Start off by applying two coats of your base colour. Once you’re finished with this and it’s had a little time to dry, the fun part comes in. Cut the straws down into smaller sections (I go with sections that are about 1-2 inches long) so that you’ll have a little more control. Next, you’re going to want to apply strips of scotch tape around the edges of your nails to keep your fingers clean because this is going to get a little messy! To create the splatter effect, make a little “puddle” of your first splatter shade on a piece of paper or cardboard—you’re going to want to use about five drops to make it a little deep. Dip one end of the straw in it, hover over your nail and blow! Do this until you’re satisfied with how it looks. Continue with the other colours you want to use until you’ve created a masterpiece (I used a white base with red and silver splatter) and lock it in with a top coat. Clean up your cuticles to get any polish off and you’re good to go!
Products used: Avon Speed Dry+ Nail Enamel in “Prompt and Pearly,” L’Oréal Paris Nail Color in “He Red My Mind,” Clinique A Different Nail Enamel in “Strappy Sandals”

Sandra D. Sobon
Toronto | Moms Makeup Stash
Celebrating Canada’s birthday on July 1st is time well spent with family and friends and every year my long weekend is jam packed with good eats and good times! This year, Canada is turning 146 years old and to celebrate my national pride I decided to jazz up an ordinary red manicure by adding some easy and playful accents. I am not a pro when it comes to nail art by any means but it’s easy to get creative when you have an excuse and the right tools. I started by painting my nails red using two coats of Please Red-Cycle by Nicole By OPI. I then used some nail art tape to line each individual nail across (width wise) and coated the silver tape with white polish using a nail art pen for precision. For the accent nail, all I did was paint the tip white and make dots using a dotting tool and the same red polish. Make sure to add a clear polish overtop to seal and protect all of that hard work! Happy Birthday Canada!
Products used: Nicole by OPI Polish – Please Red-Cycle, Nubar Nail Art Pen – Basic White, Bourjois Dotting Tool, Bourjois Nail Tape (comes in the Easy Nail Art Kit), Any clear polish or top coat
Marilou Moles
Ottawa | Twenty York Street
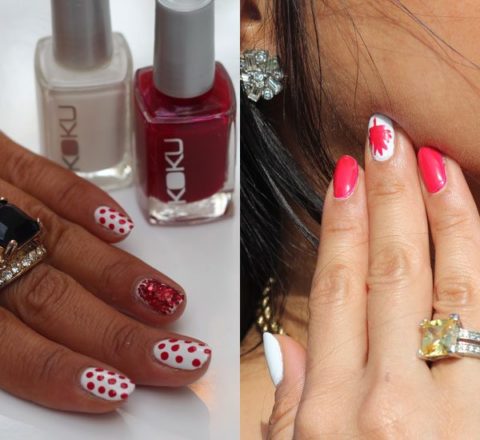
It’s the day of the red, the white and, of course, the maple leaf! Canada Day is only a few days away, Ottawa is in frenzy and the inspiration for Oh Canada-inspired nail art is endless! This is the day where festive, excitement and creativity comes together in the spirit of celebrating our great country! What better way to express that than with sparkles, shimmers, stripes, polka dots and of course, the maple leaf! Paint your nail with either white or red as base (seen here is Koku’s Delicious Red and White as Snow) and use a dotter or the top of a pin to randomly place dots, big and small, all over you nails. Pick an accent nail and sketch something Canadian – a maple leaf, a beaver tail or dare I say… a poutine? Make sure to apply top coat to seal your work of art and make it last longer. And remember, Canada Day is not complete without the reddest of lips so go on, find your perfect shade and paint the town red to celebrate!
Products used: Koku Nail Bar in “Delicious Red,” Koku Nail Barin “White as Snow,” Seche Vite
Alison Leong
Vancouver | Alison*Elle
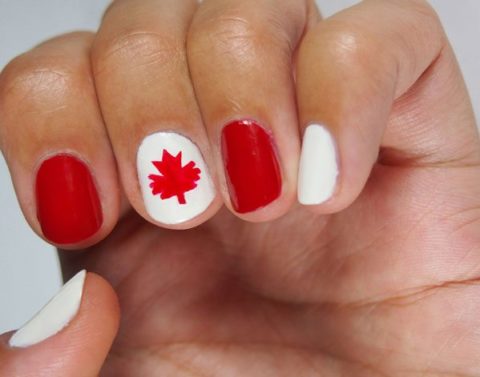
Red and white nail polishes are absolute necessities for a patriotic manicure, especially this one in which my middle three fingers are acting as the Canadian “flag”. After alternating red and white bases on my nails, I freehanded the maple leaf using a red nail art polish. The fine brush is key to getting a somewhat accurate leaf (they are a little tricky but totally doable). Happy Canada Day!
Products used: Layla Pro in “GB31,” Essie in “Blanc,” Avon Nail Art Enamel in “Reviving Red”
Aïda Michelle Lopes
Montreal | I Fell For That
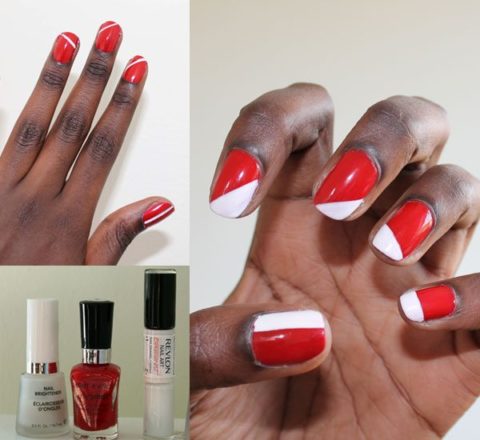
I’m not very good at drawing on my nails so I usually play with shapes and lines when it comes to nail art. Here’s how I achieved my Canada Day-inspired nail art in four easy steps. First, apply Revlon’s Nail Brightener as a base. I’ve been using it for a while now and I’m starting to see its effects on my nails. Next, I painted my nails in red using Wet’n’Wild Megalast. Then, if like me you are unable to make a straight line, Revlon’s Nail Art Expressionist is perfect for you. It comes with a super thin brush that makes it easier. Finally, fill it with the white and apply a top coat. I’ve been using Revlon’s Extra Life No Chip Top Coat for two years now because it’s simply the best in my opinion.
Products used: Revlon Nail Brightener, Revlon Nail Art Expressionist, Revlon Extra Life in “No Chip Top Coat, Wet N Wild and Megalast in Red”
Ellie Somfelean
Montreal | My Beauty Box
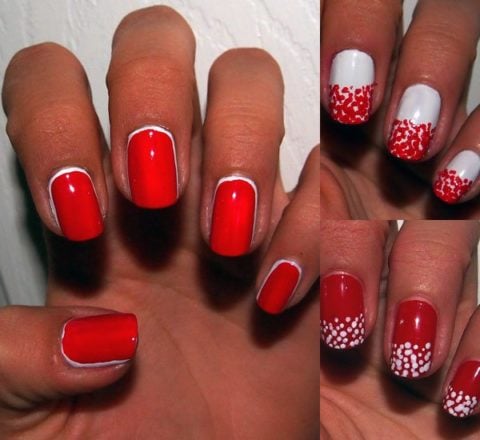
Red and white. Colours of our flag, colours I chose to play with to help celebrate July 1st. Now, I am no expert in manicures, but there are a few simple techniques you can use to achieve cute designs while showing off your patriotism. You don’t need any skill really, nor do you need to go buy any fancy tools, a mechanical pencil or toothpick can make for a perfect dotting tool. Start of with a polished nail and then starting at the tip dot nail polish and gradually reduce the size while going on inwards. This look reminds me of a sort of French mani with a twist. Another look that’s very on trend right now and so easy to do is the silhouette mani. Apply a white nail polish and then trace the other colour inside, letting the first layer peak around the margins. Very classy and so easy to do.
Products used: Rimmel 60 Seconds in “Red Steady Go,” Maybelline Color Show in “Porcelain Party,” toothpicks, mechanical pencil
Tess Lopez
Toronto | Makeup By Tess
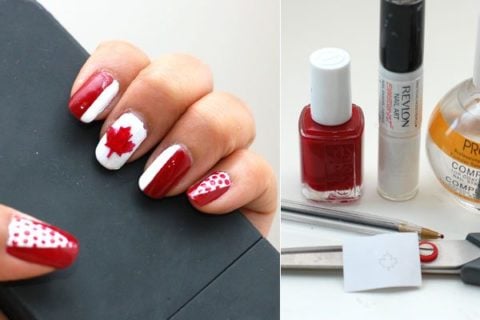
Canada Day is fast approaching and to celebrate our nation’s 146th birthday, here is a nail look to show everyone how proud we are to be Canadian!
With this look, I tried to emulate a Canadian flag with three of my fingers. With the remaining fingers, rather than leaving it solid red, I thought I would add a pattern to keep the look unique.
Don’t be discouraged if you don’t have the proper nail tools! I’m going to show you how I created this look with things you can find at home!
– To create a triangle on your thumb and pinky, use two pieces of tape. This will act as a guide/stencil and ensure your lines are straight.
– If you don’t have a dotting tool to create the polka dots, use a ballpoint pen. Drop a bit of your nail polish on a piece of paper or Styrofoam plate and dip your pen into the red polish. Apply dots where desired.
– To create the ends of the flag (pointer finger and ring finger), you can freehand the white line and fill it in. An alternative is using your trusty tape as a guide.
– If you don’t have a nail brush that has long, thin, but dense bristles to draw on the maple leaf, print a small maple leaf from the computer, cut it out, and paint over it with your red nail polish.
– To apply the maple leaf on your nail, use your clear nail polish as glue. Dab a bit on your nail and gently place the maple leaf on it. Ensure you push down the edges of the maple leaf to keep it secure.
– Add a topcoat to all your nails. This will make your patterns smooth as well as add a protective layer to help make your polish last longer.
Products used: Essie in “A-List,” Revlon Nail Art Expressionist in “Night & Degas,” Pro FX Complete 3 Top Coat, Base Coat, Nail Strengthener, Scissors, Ballpoint Pen, Tape, Tiny print out of maple leaf

